Written by: Alex Ireland, MD (NUEM PGY-3) Edited by: Kim Iwaki, MD (NUEM Alum '18) Expert commentary by: Benjamin Schnapp, MD
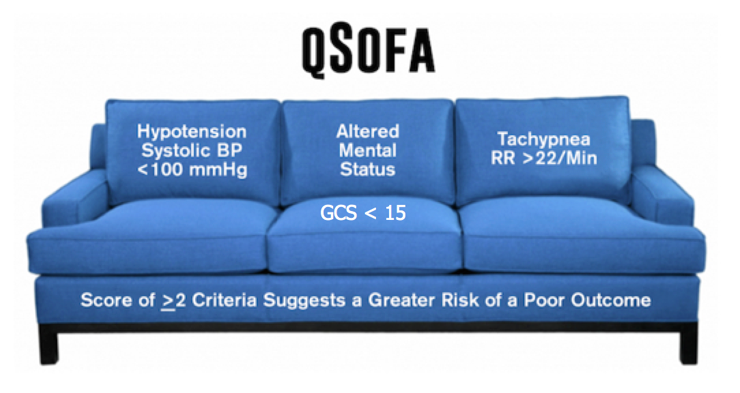
Sepsis, a maladaptive host-response to infection, is a leading cause of morbidity and mortality within the healthcare system. We have known about and discussed this disease for decades, but recently have begun to alter our criteria for its diagnosis. Since 1991, we have categorized sepsis as a derangement in physiologic or laboratory parameters caused by a host’s systemic inflammatory response to an infection [1]. Two of 4 criteria, listed below, must be met in addition to a suspected source of infection. Sepsis complicated by end-organ dysfunction was deemed severe-sepsis. And sepsis-induced hypotension refractory to adequate fluid resuscitation was deemed septic shock.
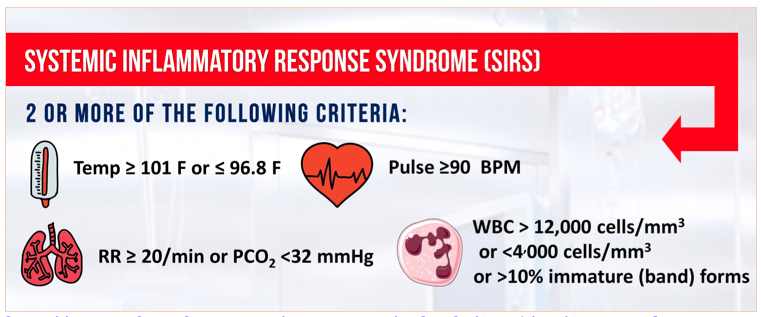
Source: http://www.admitologist.com/wp-content/uploads/2015/12/Sepsis-Info.jpg
Using these definitions, multiple studies have resulted in consensus guidelines that reduce morbidity and mortality, including early adequate fluid resuscitation, obtaining blood cultures before antibiotic therapy, administration of broad-spectrum antibiotics within 1 hour of diagnosis, and use of norepinephrine as a first-line vasopressor to maintain MAP > 65 mmHg2.
Recently, due to presumed limitations in the original definition, a task force was convened and a new definition was proposed. They define sepsis as life-threatening organ dysfunction caused by a dysregulated host response to infection [3]. This organ dysfunction is calculated using the Sequential Organ Failure Assessment (SOFA) Score. While the original is quite cumbersome, the qSOFA score is a simplified version easily used at the bedside. While qSOFA has already shown promise in predicting patients with sepsis at risk for increased mortality [4], it remains to be seen whether it is useful at screening patients for sepsis early in the disease process.
Source: http://epmonthly.com/article/sepsis-gets-an-upgrade/
Comparison of qSOFA score and SIRS criteria as screening mechanisms for emergency department sepsis. Haydar S, Spanier M, Weems P, Wood S, Strout T. Am J Emerg Med. 2017 Jul 6. pii: S0735-6757(17)30509-0.
This study was a retrospective chart review performed at a single academic tertiary care hospital. Its primary objective was to determine both the sensitivity and the diagnostic timeliness of the qSOFA score compared to SIRS criteria in a population of emergency department patients. While not explicitly stated, its secondary objective was to determine the test characteristics (including sensitivity, specificity, negative predictive value, positive predictive value, and the area under the receiver operatic characteristic curve) of qSOFA and SIRS to identify septic patients that would ultimately die in-hospital.
The sample of patients were drawn from a base population that was treated with antibiotics in the ED for a suspected infection, admitted, and ultimately expired or subsequently discharged with a Center for Medicare Services Diagnosis Related Grouping (DRG) for sepsis.
Data were extracted to fulfill the criteria for both qSOFA and SIRS, including respiratory rates, systolic blood pressures, heart rates, white blood cell counts, temperatures, altered mental status (AMS), and the times at which these parameters were documented. Pre-hospital data was excluded. Of note, both physician and nursing documentation were reviewed. Interestingly, laboratory values (i.e., WBC count) were considered to be present at the time of the blood draw, not at the time of result. Data was extracted by a single reviewer for all data points except for the timing of AMS. During a random sampling by two reviewers to determine reliability, the kappa value of 0.4 was deemed inappropriate, prompting a consensus review of all charts to determine initial time of AMS.
Of the 200 sampled patients, one was excluded due to transfer from an outside facility, leaving 199 for analysis (Table 1). Of note, median age was 71 years (range 18-102) and in-hospital mortality was 11.0% (n = 22). The majority of patients were white (97%, n = 194) and Non-Hispanic (100%, n = 200).
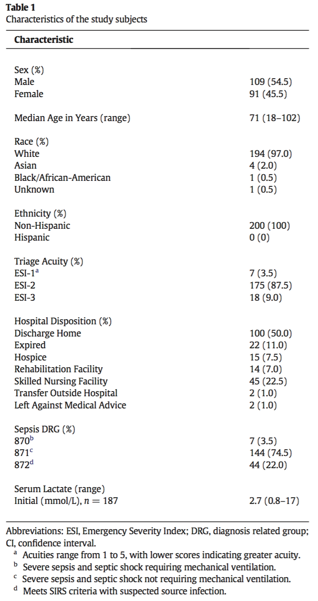
Table 1
SIRS criteria outperformed the qSOFA score in sensitivity for diagnosing sepsis while in the ED, mean time to diagnosis, and median time to diagnosis (Table 2). The overall sensitivity for qSOFA was quite poor, and in particular, only 36.7% of patients met the AMS requirement. In determining in-hospital mortality, qSOFA had a much higher specificity and positive predictive value, but ultimately the overall performance as evidenced by the AUROC was relatively poor for both SIRS and qSOFA and they did not differ significantly (Figure 1).

Table 2

Figure 1
qSOFA came after years of criticism towards the SIRS criteria. It has long been recognized that the SIRS criteria are not specific for infection, and that a variety of conditions including pain, trauma, and nonspecific inflammation can place patients in a SIRS-positive category. A recent study demonstrated that nearly half of hospital ward patients developed positive SIRS criteria at least once during their stay [5]. If not categorized appropriately, this could lead to inappropriate antibiotic utilization and fluid resuscitation.
However, the introduction of qSOFA the Sepsis-3 criteria has its own inherent limitations. Primarily, the focus has shifted towards hypotension and altered mental status as markers of end-organ dysfunction. While these features are intuitively associated with a higher disease burden (i.e., altered patients and those that are hypotensive are clearly sicker than those that are not), it shifts the focus from screening to prognostication. While high qSOFA scores have proven to correlate with in-hospital mortality [4], is this really the most important question for the emergency department physician?
More useful is a tool that screens positive for the largest proportion of potentially infected patients, leaving clinical judgment to further distill appropriate workup and treatment. This paper suggests that SIRS criteria are much better suited for this purpose. Compared to qSOFA, SIRS had a sensitivity for diagnosing sepsis that was over 36% higher, with a reduction in time to diagnosis by approximately one half.
The major strength of this paper is the wide net of inclusion. Essentially, all patients admitted and subsequently diagnosed with sepsis were included and randomly sampled. This group spanned a variety of ages, acuities, and types of infections. This was a strong attempt at making the data as generalizable as possible. However, the population at Tufts Medical Center in Maine, predominately White and Non-Hispanic may limit the external validity to more diverse practice environments.
Timing of diagnosis was another factor fraught with both pros and cons. While not explicitly stated, it seems intuitive that nursing documentation review in addition to physician notes would allow for expedited recognition of vital sign abnormalities and the onset of AMS. However, even with this inclusion, the retrospective determination of AMS onset without objective documentation practices is prone to error. One can imagine that late documentation in a busy emergency department setting may have contributed to the delay in time from arrival to documentation of qSOFA criteria. Furthermore, it seems odd that the laboratory results were considered to be present at the time of blood draw rather than at the time of result availability. Clinically, this is not how we would be able to diagnose sepsis in real-time, and it may have falsely hastened the time from ED arrival to documentation of SIRS criteria in this study.
Lastly, it is important to recognize that the Surviving Sepsis campaign has championed early recognition and treatment as the key principle to reducing morbidity and mortality. This has led many hospital systems to incorporate SIRS criteria into the electronic health record, to flag patients as early as possible for recognition. This is not as feasible with qSOFA, as the component of altered mentation is subject to individual interpretation.
In summary, sepsis is a critical diagnosis that must be made early to improve outcomes. The SEPSIS-3 campaign promotes the use of qSOFA criteria, which are clearly a prognostic marker for increased mortality. However, the SIRS criteria are more useful in screening for sepsis early in the disease process in emergency department patients.
Expert Commentary
As Dr. Ireland’s excellent review of this attempted validation study notes, what was originally heralded as a new paradigm in identifying the warning signs of sepsis (qSOFA) appears to in fact be (significantly) worse than the SIRS criteria we all know and (don’t) love.
As others have noted far more eloquently than I (see: pretty much anything that Josh Farkas of PulmCrit has written on qSOFA), it really shouldn’t be surprising to any of us that qSOFA is less sensitive than SIRS. By including hypotension and altered mental status (just another word for end-organ dysfunction in the old paradigm), qSOFA is essentially screening for what was formerly known as ‘septic shock.’ Not a surprise that patients with 2 or more of these criteria don’t do well from a mortality standpoint. This isn’t what I need from a screening test for sepsis in the ED though - I can’t think of the last time I walked into a patient’s room and found them altered, hypotensive and tachypneic and thought to myself, “Hmm, I wonder if they are sick or not?”
While SIRS isn’t perfect, it at least approaches the requisite sensitivity to make it a useful screening test. It is important to remember that you as the clinician are tasked with providing the specificity - the warning signs of sepsis overlap with many other acute (and less acute) processes. Patients screening SIRS positive may need aggressive management of conditions other than sepsis, and not every sepsis patient must receive the full sepsis bundle - evaluate each patient fully before initiating protocol-based care.

Benjamin Schnapp, MD
Assistant Residency Program Director, University of Wisconsin-Madison
How to Cite This Post
[Peer-Reviewed, Web Publication] Ireland A, Iwaki K (2018, September 17). qSOFA SIRS. [NUEM Blog. Expert Commentary by Schnapp B]. Retrieved from http://www.nuemblog.com/blog/qSOFA
Other Posts You May Enjoy


References:
BoneRC, BalkRA, CerraFB, etal. American College of Chest Physicians/Society of Critical Care Medicine Consensus Conference: definitions for sepsis and organ failure and guidelines for the use of innovative therapies in sepsis. Crit Care Med. 1992;20(6):864-874.
Dellinger RP, Levy MM, Rhodes A, et al. Surviving sepsis campaign: international guidelines for management of severe sepsis and septic shock: 2012. Crit Care Med 2013;41(2):580–637.
Singer M, Deutschman CS, Seymour CW, et al. The third international consensus def- initions for sepsis and septic shock (sepsis-3). JAMA 2016;315(8):801–10.
Freund Y, Lemachatti N, Krastinova E, et al. Prognostic accuracy of sepsis-3 criteria for in-hospital mortality among patients with suspected infection presenting to the emergency department. JAMA 2017;317(3):301–8.
Churpek M.M., Zadravecz F.J., Winslow C., et al: Incidence and prognostic value of the systemic inflammatory response syndrome and organ dysfunctions in ward patients. Am J Respir Crit Care Med 2015; 192: pp. 958-964
Comparison of qSOFA score and SIRS criteria as screening mechanisms for emergency department sepsis. Haydar S, Spanier M, Weems P, Wood S, Strout T. Am J Emerg Med. 2017 Jul 6. pii: S0735-6757(17)30509-0.


![Figure 2. Left Lateral Decubitus Film [9]Left lung collapses when in dependent position. This is normal and does not suggest foreign body or air trapping in left lung.](https://images.squarespace-cdn.com/content/v1/549b0d5fe4b031a76584e558/1532104060396-YKC9XJE1PAZLQFSY8M58/Picture1.png)
![Figure 3. Right Lateral Decubitus Film [9]Right lung does not collapse when in dependent position. This is abnormal and suggests foreign body in right bronchus causing air trapping in right lung.](https://images.squarespace-cdn.com/content/v1/549b0d5fe4b031a76584e558/1532104241725-LTBFSCB9AM35GBMQ3CX5/Picture2.png)