Posts tagged #OBGYN

Molar Pregnancy


Written by: Conner Morton, MD (NUEM ‘26) Edited by: August Grace (NUEM ‘24)

Expert Commentary by: Dana Loke, MD, MS


Expert Commentary

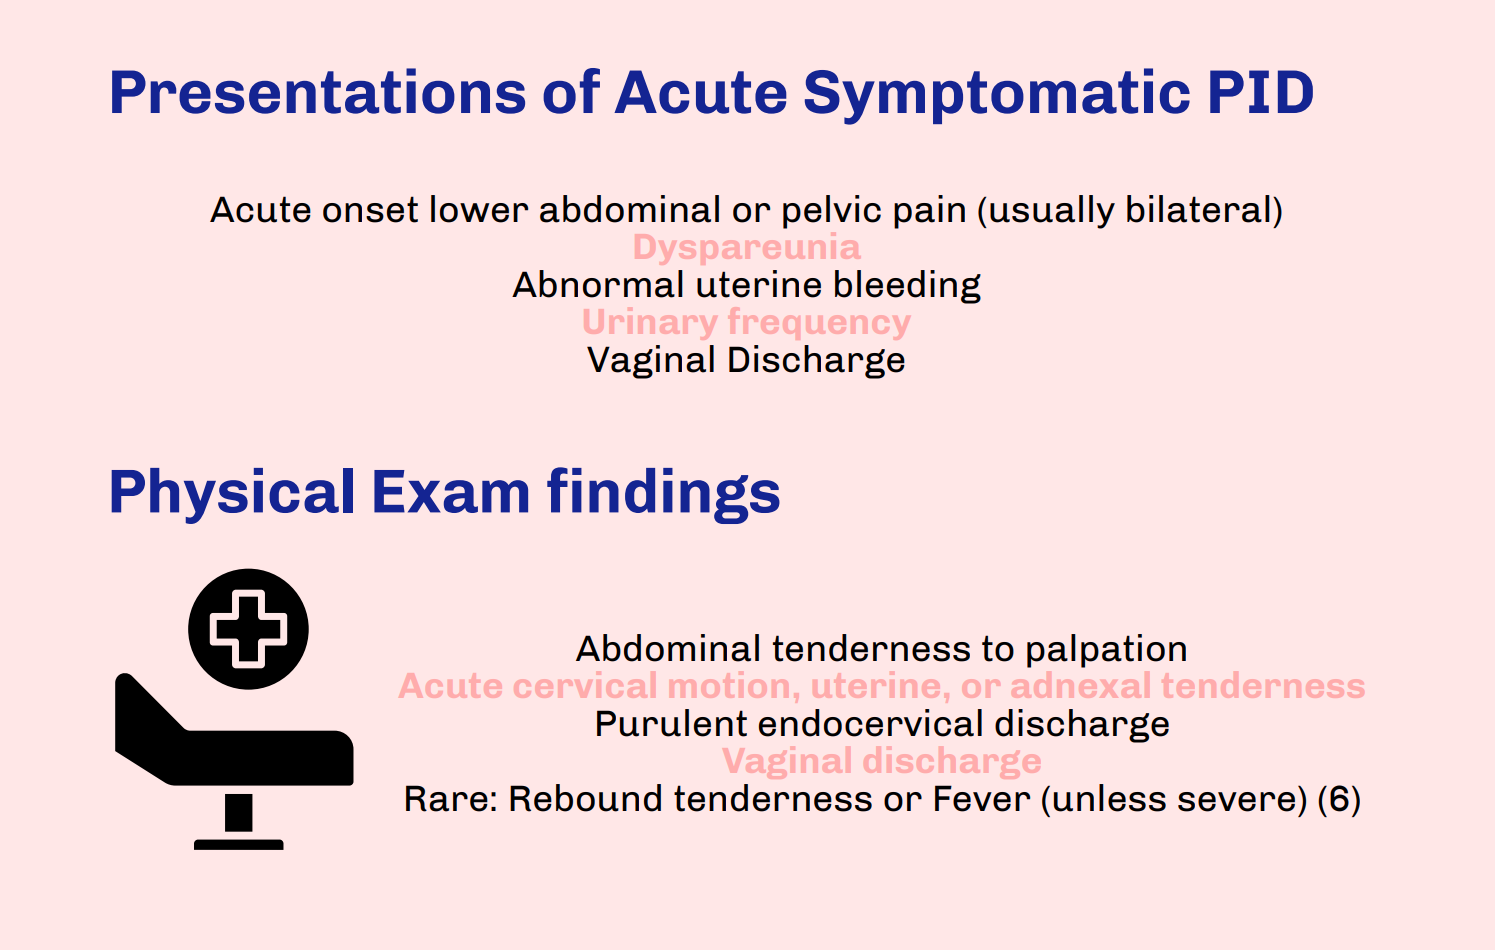
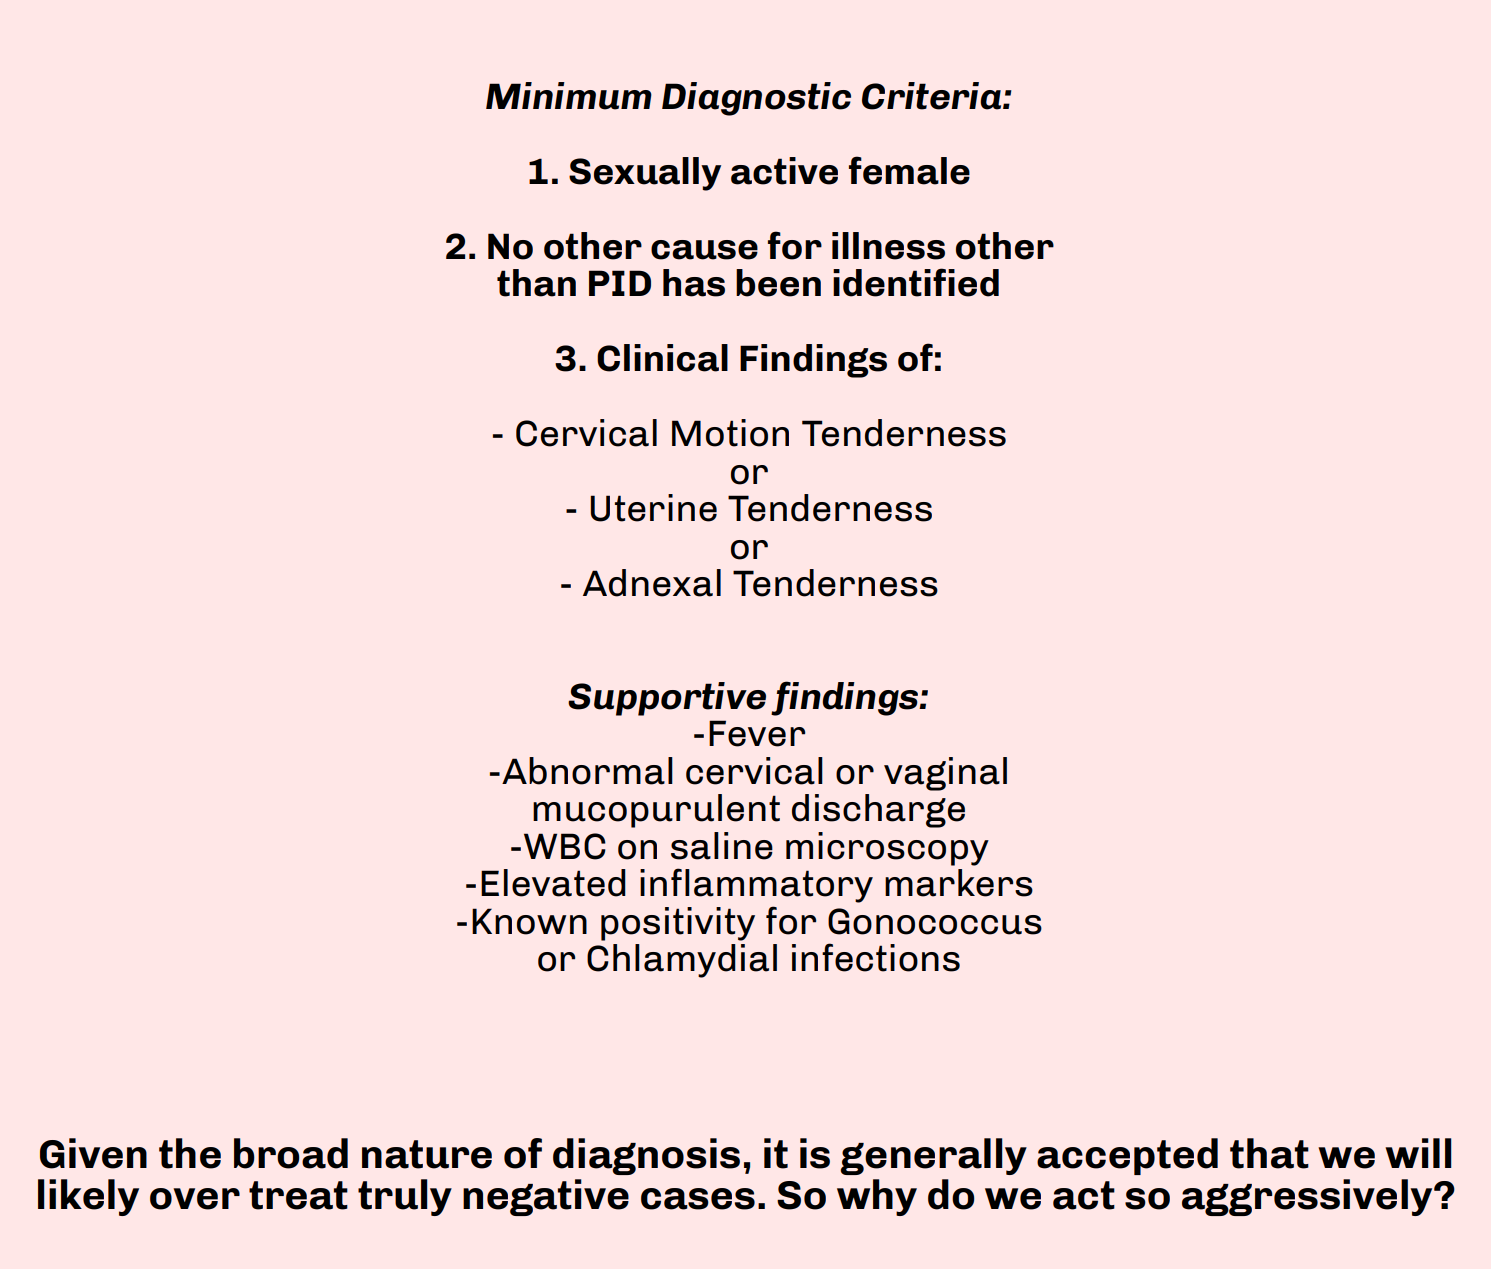
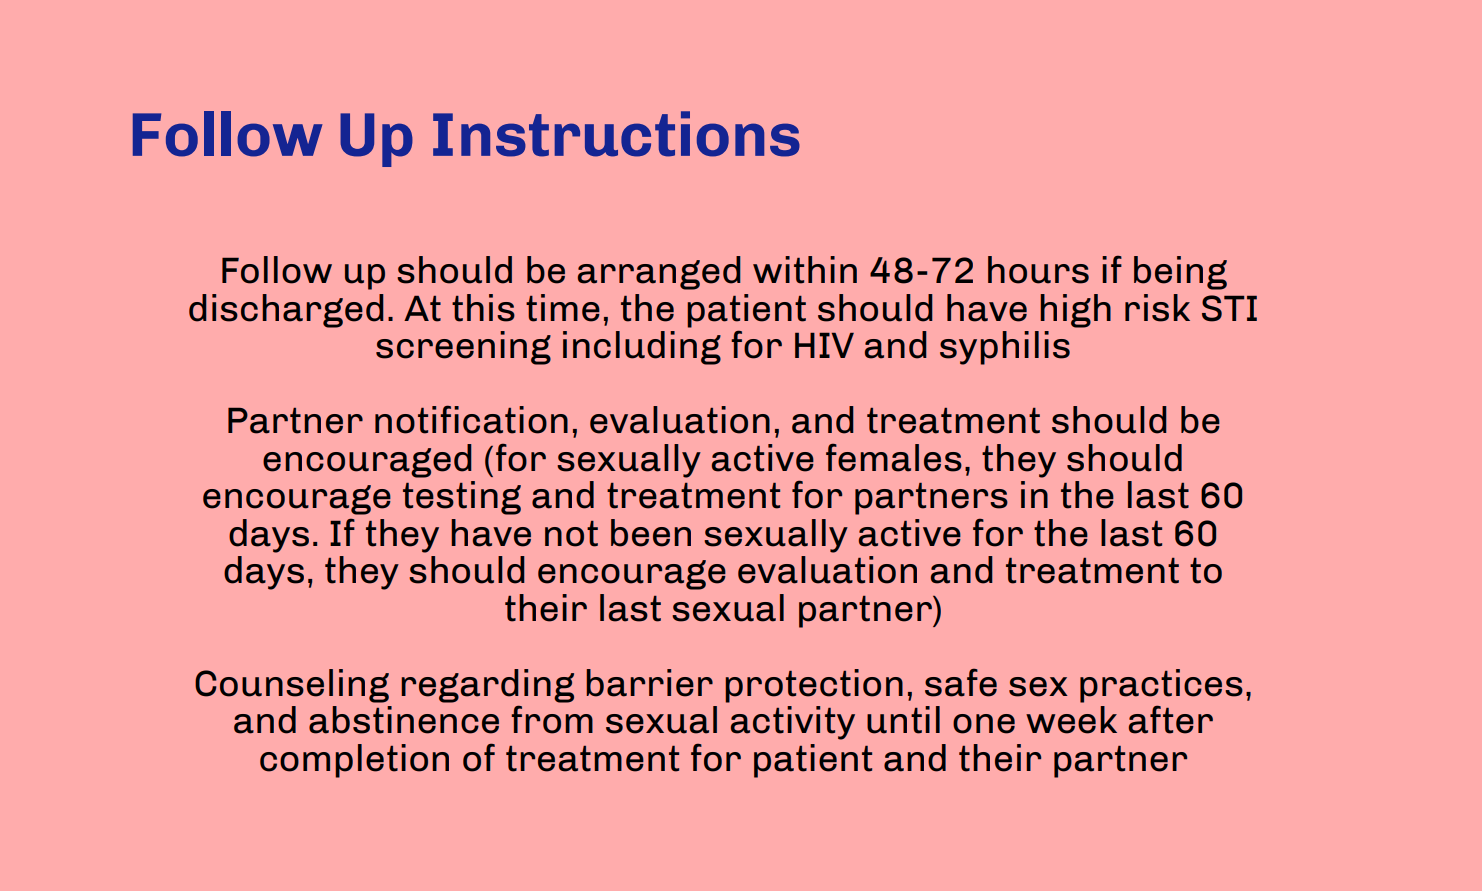
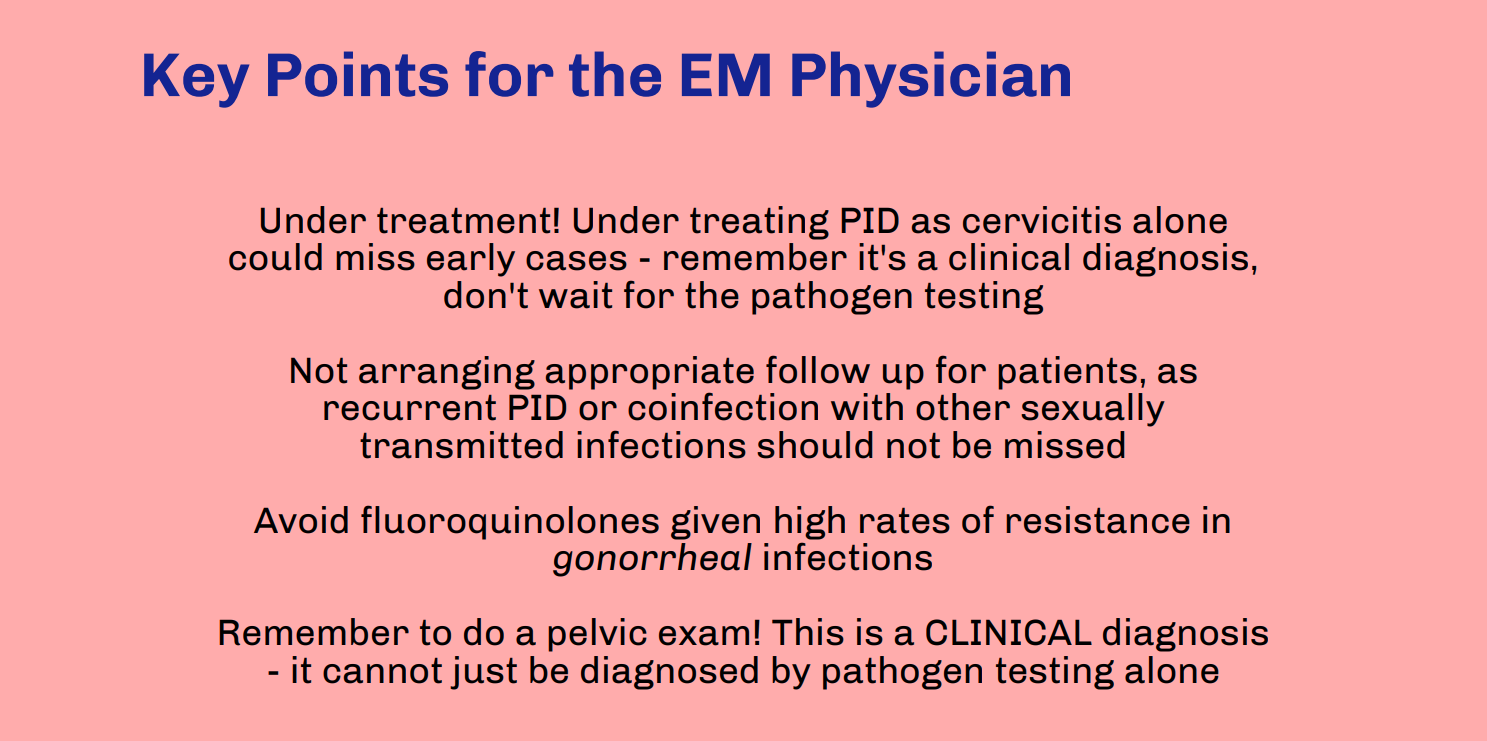
Thank you to Drs. Morton and Grace for this excellent infographic highlighting molar pregnancy and its relevance to Emergency Medicine providers. While rarer than other pregnancy issues seen in the Emergency Department, molar pregnancy is an important diagnosis for Emergency Medicine providers to be able to recognize, understand, and treat. As listed in the above post, symptoms of molar pregnancy can be similar to viable pregnancy and its complications, so it is important to obtain a timely ultrasound in any patient with unknown pregnancy location or if considering molar pregnancy. While molar pregnancy is not a difficult diagnosis to make as long as an ultrasound is done, it is important to be wary of its complications and treat appropriately. This includes monitoring vitals, specifically in consideration of hemorrhage and pre-eclampsia, with resuscitation and transfusion as needed. Consultation with OB/GYN should occur in the Emergency Department for immediate next steps, which will include procedural management. When updating the patient about the diagnosis and next steps, make sure to sensitively explain that molar pregnancy is nonviable. Lastly, make sure to complete a comprehensive review of systems and physical exam; molar pregnancy is associated with choriocarcinoma, which is known to spread widely and aggressively throughout the body. 

Dana Loke, MD, MS

Assistant Professor

Emergency Medicine

University of Wisconsin-Madison


How To Cite This Post:

[Peer-Reviewed, Web Publication] Morton, C. Grace, A. (2024, Apr 1). Molar Pregnancy. [NUEM Blog. Expert Commentary by Loke, D. Retrieved from http://www.nuemblog.com/blog/molar-pregnancy


Other Posts You May Enjoy

Posted on April 1, 2024 and filed under Obstetrics & Gynecology.

Resuscitative Hysterotomy

Written by: Aldo Gonzalez, MD (NUEM ‘23) Edited by: Justine Ko, MD (NUEM ‘21)
Expert Commentary by: Paul Trinquero, MD (NUEM '19) & Pietro Bortoletto, MD


Introduction

Resuscitative hysterotomy (RH) is the new term for what was previously called perimortem cesarean delivery (PMCD). The new nomenclature is being adopted to highlight the importance of the procedure to a successful resuscitation during maternal cardiopulmonary arrest (MCPA). It is defined as the procedure of delivering a fetus from a gravid mother through an incision in the abdomen during or after MCPA. The goal of the procedure is to improve the survival of the mother and the neonate.

Physiology

There are physiologic changes that occur during pregnancy which reduce the probability of return of spontaneous circulation (ROSC) during cardiac arrest. Physiologic anemia of pregnancy reduces the oxygen carrying capacity of blood and results in decreased delivery of oxygen during resuscitation. The large gravid uterus elevates the diaphragm and reduces the lung’s functional reserve capacity (FRC),  which when combined with increased oxygen demand from the fetus results in decreased oxygen reserves and resultant risk for rapid oxygen desaturations. The size of a gravid uterus at 20 weeks results in aortocaval compression which reduces the amount of venous return from the inferior vena cava and reduces cardiac output during resuscitation. The theory behind resuscitative hysterotomy is to increase the probability of ROSC by reducing the impact of aortocaval compression.

Supporting Evidence 

A 2012 systematic review primarily investigated the neonatal and maternal survival rates after perimortem cesarean delivery and secondarily attempted to evaluate maternal and fetal neurological outcome and the ability to perform the procedure within the recommended time frame.

Inclusion Criteria

  • original articles, case series, case reports and letters to the editor, and reports from databases

  • had minimum of least five clinical details of the case (e.g. patient age, gravidity, parity, obstetric history, medical history, presenting rhythm, or location of arrest) 

    AND

  • the care administered (chest compression, ventilation, monitoring, drug administration)

    AND

  • maternal return of spontaneous circulation or survival to hospital discharge or fetal neonatal outcome

Exclusion Criteria

  • Post-delivery arrests

  • Studies without enough data to understand the details of the arrests

  • Studies with unclear maternal and fetal outcomes

Population

  • Pregnant woman that

    • (1) had a cardiac arrest or a non-perfusing rhythm 

    • (2) received chest compression and/or advanced life support medications and/or defibrillation

  • Average maternal age: 30.5±6.5 years (median 32, range 17–44, IQR, 26.5–35.5, n = 80)

  • Gravidity: 2.5±1.5 (median 2, range 1–7, IQR 1–4, n = 59)

  • Parity: 1.1±1.3 (median 1, range 0–6, IQR 0–2, n = 57)

  • Singleton Pregnancies: 90.4% (n = 85)

  • Average gestational age at arrest: 33±7 weeks (median 35, range 10–42, IQR 31–39, n = 85)

Results

  • for cases undergoing PMCD, earlier time from arrest to delivery was associated with increased survival (p < 0.001, 95%CI 6.9–18.2)

    • surviving mothers: 27/57; 10.0±7.2 min (median 9, range 1–37)

    • non-surviving mother: 30/57; 22.6±13.3 min (median 20, range 4–60)]

  • for neonates delivered by PMCD/RH earlier time from arrest to delivery was associated with increased survival (p = 0.016)

    • surviving neonates: 14±11 min (median = 10, range = 1–47)

    • non-survivor neonates: 22±13 min (median = 20, range = 4–60) 

  • Only 4 cases met the timeframe of less than minutes

Take-Aways: Performing a PMCD/RH in the 4-5 minutes time frame is difficult. However, PMCD/RH beyond the proposed time is still beneficial and earlier time to delivery from arrest is associated with better outcomes

Guideline Recommendations

Perform basic life support (BLS) in the same way as non-pregnant patients

  • Place patient in supine position

    • Left lateral decubitus (left lateral tilt) positioning is no longer recommended during compressions because of reduced efficacy of chest compressions

  • No modification of Chest compressions 

    • Rate: 100-120 per minute

    • Depth: at least 2 inches (5 cm)

    • Allow for full chest recoil between compressions

    • Avoid interruptions as much as possible

  • No modification of Ventilation

    • Use bag-ventilation 

    • Compression to breath ratio: 30:2 before advanced airway

Perform advanced cardiac life support (ACLS) as in non-pregnant women

  • No modification of Ventilation

    • Once breath every 6 seconds (10 BPM) with advanced airway

  • No modification of medications

    • Use 1 mg Epinephrine of epinephrine every 3-5 minutes

  • No modification to defibrillation

    • Use adhesive pads on patient

    • Place in anterolateral position 

      • Lateral pad should be placed under breast tissue

    • Defibrillate for Ventricular fibrillation or Ventricular tachycardia

    • Use usual Voltages

      • Biphasic: 120-200 Joules

    • Resume compressions after shock is delivered

Special considerations during resuscitation

  • Obtain access above the diaphragm to minimize the effect of aortocaval compression on the administration of drugs

  • Perform left uterine deviation during resuscitation to reduce aortocaval compression

  • If a gravid patient suffers a cardiac arrest mobilize resources to prepare for the need for resuscitative hysterotomy and the resuscitation of the fetus early

  • Palpate the size of the gravid uterus

    • If above the height of the umbilicus then patient is most likely greater than 20 weeks gravid and a candidate for RH

  • Strongly consider performing RH (PMCD) if the patient does not achieve ROSC by the 4-minute mark and qualified staff to perform the procedure are present

  • Aim to have the procedure done by the 5-minute mark

  • Consider performing RH (PMCD) sooner if maternal prognosis is poor or prolonged period of pulselessness

  • RH should be performed at the site of the resuscitation

  • Do not delay procedure to prepare abdomen

    • May pour iodine solution over abdomen prior to incision

  • Do not delay procedure for surgical equipment if scalpel is available

  • Continue performing LUD while performing RH

Figure 1: One-handed left uterine deviation technique

Figure 2: Two-handed left uterine deviation technique

Steps for Resuscitative Hysterectomy

Pre-procedure

  • Gather supplies to perform RH

    • Personal Protective Equipment

      • Gloves

      • Face mask

      • Apron/gown

    • Resuscitative Hysterotomy Equipment

      • Scalpel(the minimum equipment to perform procedure)

      • Blunted Scissors

      • Clamps/Hemostats

      • Gauze

      • Suction

      • Large absorbable sutures

      • Needle Holder

      • Antiseptic Solution

    • Neonatal resuscitation equipment

      • Dry Linens

      • Neonatal Bag Valve Mask

      • Neonatal Airway supplies

      • Suction

      • Umbilical venous access equipment

      • Neonatal resuscitation drugs

      • Baby Warmer

      • Plastic Bag

  • Form teams to perform Resuscitative Hysterotomy

    • Resuscitative Team

    • Resuscitative Hysterotomy Team

    • Neonatal Resuscitation Team

Procedure

  • Maintain patient in supine position and continue compressions

  • Continue Left Uterine Deviation until the start of incision 

  • Quickly prepare the skin with antiseptic solution (do not delay for skin prep)

  • Perform midline vertical Incision with scalpel on the abdomen from pubic symphysis to umbilicus and cut through skin and subcutaneous tissue until fascia is reached

  • Use fingers to bluntly dissect the rectus muscle fascia access the peritoneum (can use scalpel or blunt scissors)

  • Locate the uterus and differentiate it from the bladder (bladder yellow and enveloped in fatty tissue)

  • Make a vertical incision from the lower uterus to the fundus with scalpel (can use blunt scissors)

  • If the placenta is encountered while entering the uterus, cut through it

  • Use a cupped hand to locate the fetal part closest to pelvis

  • Elevate the located fetal part and pass through uterine incision while applying transabdominal pressure with other hand

  • Use traction and transabdominal pressure to deliver the rest of the baby

  • Clamp the cord at two spots and cut in between both clamps

  • Hand the baby to the neonatal team

  • Deliver placenta with gentle traction

Post-procedure

  • Continue performing compressions

  • Consider stopping if ROSC not achieved after several rounds and  depending on the cause of PMCA

  • Give medications to promote uterine contraction

  • Analgesia and sedation may be required if patient achieves ROSC

  • Bleeding will be worse if ROSC achieved and may require pharmacologic and nonpharmacologic interventions

  • Closure will depend on whether the patient achieves ROSC and may necessitate careful closure to prevent further bleeding. Best performed by an obstetrician. If an obstetrician is unavailable, pack the uterus with gauze and clamps actively bleeding vessels to reduce bleeding. 

  • Administer prophylactic antibiotics

References

  1. Einav, S., et al. (2012). "Maternal cardiac arrest and perimortem caesarean delivery: evidence or expert-based?" Resuscitation 83(10): 1191-1200.

  2. Jeejeebhoy, F. M., et al. (2015). "Cardiac Arrest in Pregnancy: A Scientific Statement From the American Heart Association." Circulation 132(18): 1747-1773.

  3. Kikuchi, J. and S. Deering (2018). "Cardiac arrest in pregnancy." Semin Perinatol 42(1): 33-38.

  4. Parry, R., et al. (2016). "Perimortem caesarean section." Emerg Med J 33(3): 224-229.

  5. Rose, C. H., et al. (2015). "Challenging the 4- to 5-minute rule: from perimortem cesarean to resuscitative hysterotomy." Am J Obstet Gynecol 213(5): 653-656, 653 e651.

  6. Soskin, P. N. and J. Yu (2019). "Resuscitation of the Pregnant Patient." Emerg Med Clin North Am 37(2): 351-363.

  7. Walls, R. M., et al. (2018). Rosen's emergency medicine: concepts and clinical practice. Philadelphia, PA, Elsevier.


Expert Commentary

This is an excellent review of an extremely rare, but potentially life-saving procedure. It may seem daunting to perform (and it should), but the evidence would say that a resuscitative hysterotomy (RH), especially if performed promptly, drastically improves survival during the catastrophic scenario of maternal cardiac arrest. This is even more important because these patients are young (and often relatively healthy) and could potentially have decades of meaningful quality of life if they can survive the arrest. That being said, this procedure is so rare that most of us not only have never performed it, but often have never even seen it. Not only that, but unlike other rare lifesaving procedures (such as cricothyroidotomy or resuscitative thoracotomy), RH is extremely difficult to practice in cadaver labs due to the unavailability of pregnant cadavers. So, we are left with the next best thing: familiarizing ourselves with the anatomy, physiology, and simplified technique of the procedure and mentally rehearsing it so that when the time comes, we can be ready.

For these rare procedures, in addition to the excellent and thorough review above, it is also helpful to simplify and rehearse the fundamental steps. I’m not an obstetrician and certainly not an expert on this procedure, but I’ve mentally prepared myself for what I would do in the event that I am faced with this grave situation and categorized it into the following simplified five step plan. Also, prior to writing this commentary I got a curbside consult from a friend from med school and actual obstetrician and gynecologic surgeon, Dr. Pietro Bortoletto. 

First off, the indications-- basically, a pregnant woman estimated to be >20 weeks EGA who has suffered a cardiac arrest. Don’t worry about the 4 minutes, make the decision to perform a RH right away and start prepping. Delegate someone to call the appropriate resuscitation teams if available. Then start the procedure. 

Step 1: Setup. You probably don’t have a c section kit in your trauma bay, so instead open the thoracotomy tray and you’ll have most of what you need. Go ahead and set aside the finochietto rib spreaders so that you don’t have a panic attack trying to remember how to put those together with other people watching. But everything else you’ll need will be in that tray (basically a scalpel, blunt scissors, and hemostats). 

Step 2: Cut into the Abdomen. Splash prep the abdomen with betadine. Then make your long vertical incision from the uterine fundus to the pubic symphysis. Cut through the skin and subcutaneous tissue then bluntly separate the rectus and enter the peritoneum with scalpel or blunt scissors. Extend the peritoneal incision with blunt scissors. 

Step 3: (carefully) Cut into the Uterus. First, locate the uterus. Then, take a deep breath and remember that there is a fetus inside the uterus. With that terrifying thought in mind, cut vertically into the uterus, insert your fingers, and extend the incision upwards with blunt scissors and a steady hand. If you encounter an anterior placenta, cut right through it.

Step 4: Delivery. Deliver the fetus either by cupping the head and elevating it through the incision or by grabbing a leg, wiggling out the shoulders, and then flexing the head. Hand over the neonate to whoever is taking the lead on the neonatal resuscitation (will need to be warmed, stimulated, and potentially aggressively resuscitated). Clamp and cut the cord, leaving a long enough umbilical stump for an easy umbilical line if needed. Then using gentle traction, attempt delivery of the placenta. If it isn’t coming easily, leave it alone so as not to stir up more bleeding. 

Step 5: Extra credit. If you’ve made it this far as an emergency physician and there is still no obstetrician in sight, you can continue resuscitation, focusing on stopping the uterine bleeding. While you don’t need to close the fascia or skin, it can be helpful to close the uterine incision to prevent additional blood loss. You can do this with a whip stitch using 0-0 vicryl (or if that seems like showing off, you can just pack it with sterile gauze. If you’ve got it handy, give 10 IU oxytocin to stimulate uterine contraction and further slow bleeding. Feel free to order some antibiotics as well. Otherwise, continue maternal resuscitation following typical ACLS.

The big picture here is that this is a heroic, potentially life-saving procedure that most of us will never do. But we can all take a few minutes to read an excellent review like the blog post above, watch a video, and mentally walk ourselves through the simplified steps. That preparation will afford us some much-needed confidence if we are ever faced with this terrifying scenario.

Paul Trinquero, MD

Medical Director

Department of Emergency Medicine

US Air Force Hospital - Langley

Pietro Bortoletto, MD

Clinical Fellow

Reproductive Endocrinology & Infertility

Weill Cornell Medical College


How To Cite This Post:

[Peer-Reviewed, Web Publication] Gonzalez, A. Ko, J. (2021, Dec 13). Resuscitative Hysterotomy. [NUEM Blog. Expert Commentary by Trinquero, P and Bortoletto, P]. Retrieved from http://www.nuemblog.com/blog/resuscitative-hysterotomy.


Other Posts You May Enjoy

Pelvic Inflammatory Disease

Written by: Niki Patel, MD, MD (NUEM ‘22) Edited by: Luke Neill, MD  (NUEM ‘20) Expert Commentary by: Gabby Ahlzadeh, MD

Written by: Niki Patel, MD, MD (NUEM ‘22) Edited by: Luke Neill, MD (NUEM ‘20) Expert Commentary by: Gabby Ahlzadeh, MD


PID1.PNG
PID2.PNG
PID3.PNG
PID4.PNG
PID5.PNG
PID6.PNG
PID7.PNG
PID8.PNG
PID9.PNG
PID10.PNG
PID11.PNG
PID12.PNG
PID13.PNG
PID14.PNG
PID15.PNG

Expert Commentary

Thanks for this clear and succinct post. The differential diagnosis of lower abdominal and pelvic pain is extremely broad in both premenopausal and post-menopausal women. This is when the sexual history becomes important. A question we often overlook as part of the sexual history is asking about dyspareunia, which may help differentiate gynecological from intra-abdominal causes of abdominal pain, specifically in the case of PID. 

Patients with PID are frequently misdiagnosed with a urinary tract infection because they may have urinary symptoms, but the urinalysis often shows sterile pyuria, which should raise your suspicion for PID. 

And while the utility of the pelvic exam is constantly scrutinized and questioned in patients with vaginal bleeding, it is impossible to diagnose PID without it. Having said that, the clinical diagnosis is only 65-90% specific so even minimal symptoms with no other explanation warrant antibiotic therapy to reduce further complications. 

Underdiagnosis is even more significant in the adolescent patient population, who are at highest risk for developing PID. Over 70% of PID diagnoses among adolescents are made in the ED, with approximately 200,000 adolescents diagnosed annually. If the patient is accompanied by a family member or friend, having them step out to better elicit a sexual history is essential. HIV and syphilis testing should also be considered while these patients are in the ED. 

Ensuring follow-up for these patients within 48-72 hours is essential and must be emphasized. Patients should understand the complications of PID and the importance of antibiotic compliance prior to discharge, especially in younger patients. 

Gabrielle Ahlzadeh, MD.PNG

Gabrielle Ahlzadeh, MD

Clinical Assistant Professor of Emergency Medicine

University of Southern California


How To Cite This Post:

[Peer-Reviewed, Web Publication] Patel, N. Neill, L. (2021, Apr 5). Pelvic Inflammatory Disease. [NUEM Blog. Expert Commentary by Ahlzadeh, G]. Retrieved from http://www.nuemblog.com/blog/pelvic-inflammatory-disease


Other Posts You May Enjoy